
How to Draw the Union Jack
8 Nov
This is one a series of posts on how to draw world flags. Finding the specifications for these flags, and attempting to reproduce the flag perfectly, according to the specifications, is a great way to teach yourself basic graphics programming.
Previously: Italy
Here’s my sketch for the Union Jack or Union Flag, which is the flag of the United Kingdom. The figure also appears on the flag of Australia, which we’ll tackle next.
I’ve designed this sketch so that if either the height, or the aspect ratio of the flag is changed, it will still draw correctly.
int kHeight = 250;
float aspectRatio = 2/1.0;

size((int) (kHeight*aspectRatio), kHeight);
You can change the height, or the aspect ratio, and the flag will still draw correctly. Every measurement is based solely on the flag’s height. Even the flag’s width is determined by its aspect ratio.
I chose an aspect ratio of 2:1, which is the official aspect ratio for this flag, according to the specification of the Union Jack on Wikipedia. This flag is wider than the French and Italian flags, which use a 3:2 aspect ratio.
The Wikipedia article includes the following helpful diagram.
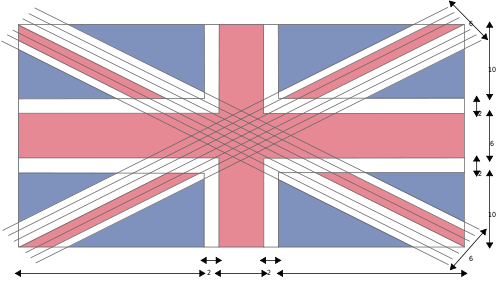
I took some useful measurements from the above specfication:
float fatRedCrossWidth= height/5.0;
float thinRedCrossWidth = height/15.0;
float whiteDiagonalCrossWidth = height/5.0;
float fatWhiteCrossWidth = height/3.0;
In the specification, the flag has a height of 30, and the fat red cross has a width of 6. Since 6 = 30/5, I can set the variable fatRedCrossWidth to height/5. Since height is an integer, I used the floating point value 5.0 to insure there is no integer rounding. I used similar logic to determine the other measurements, all derived from the height of the flag.
Figures A through E show the five steps involved in drawing this flag.

Figure 1
First, we simply fill the whole drawing with blue (figure 1a).
// Background blue field
fill(blueColor);
rect(0,0, width, height);
Then we draw the white diagonal X (figure 1b). This isn’t too hard because the X is centered on the corners. I could have drawn these lines as filled quad shapes, rather than lines, but it is more concise to draw them as fat lines. I use strokeWeight to set the line thickness to correspond to the desired width.
// White Diagonal X
stroke(whiteColor);
strokeCap(PROJECT);
noFill();
strokeWeight(whiteDiagonalCrossWidth);
line(0,0,width,height);
line(0,height,width,0);
Now comes the hard part. At first glance, the thin red diagonal X (figure 1c) is just like the white one, but if you look closely, you’ll see the 4 arms are offset to create a pinwheel effect (you can see in figure 1c that they don’t actually meet in the middle). The tricky part is figuring out how much to vertically offset them. If I were simply constructing a flag from pieces of fabric, this would be a no-brainer — I’d just line them up with the corners, but working out how much to move them in pixels requires a bit of geometric deduction.
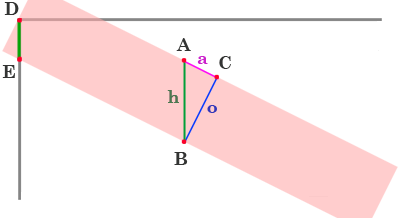
Figure 2.
In figure 2, I’ve drawn an extra large red stripe to illustrate the problem. If I were to simply draw the each stripe centered on the corner, as shown, the top of the stripe would be centered over the corner. In the specification, the top-left stripe is moved down so that the top edge of the stripe lines up with the corner. Each stripe is moved this way. The amount each stripe needs to move (up or down) is the length of the line DE, which is exactly half the height of line AB (marked as h). At the outset, I don’t know the length of h, however. The specification does give us the length of o, however: o is 2/30th (or 1/15th) the height of the flag. I can also determine the angle of the diagonal, since I know the width and height of the flag. Given these two pieces of information, I can determine the height of h by applying some known properties of angles and triangles.
In my right triangle, h, a, and o refer to the hypotenuse, adjacent and opposite sides to the angle A, respectively. The basic rules of trig state that
cos(angle) = Adjacent / Hypotenuse
tan(angle) = Opposite / Adjacent
I can manipulate the first formula to produce
I know the value of o, but what is the angle A? At first glance I don’t know, but I can figure it out. First of all, I know the angle of the diagonal red line against the top border of the box. It is a line which connects the top/left corner to the bottom right corner, so its angle can be computed using atan2() which is like a magic formula for converting cartesian coordinates to angles. In this case, the angle of the diagonal is given by atan2(height, width).
Since line h goes straight down, and line a goes at the same angle as the diagonal, the angle A must be the 90-degree compliment of that angle, given by radians(90) – atan2(height, width). Now I can plug those values into the hypotenuse formula to get the value of h.
We can determine h relative to o by setting o to 1 (or normalizing it). I’ve done this in the following source code to compute yRatio. We then use half of yRatio in order to figure out how much to move the line down (corresponding to the length of DE). This is stored in the variable offsetY which is used on each corner to move the line up or down by the correct amount.
float yRatio = 1/sin(radians(90)-atan2(height,width));
float offsetY = thinRedCrossWidth*yRatio/2;
stroke(redColor);
strokeWeight(thinRedCrossWidth);
line(0,0+offsetY,width/2,height/2+offsetY); // top left
line(width,0-offsetY,width/2,height/2-offsetY); // top right
line(width,height-offsetY,width/2,height/2-offsetY); // bot right
line(0,height+offsetY,width/2,height/2+offsetY); // bot left
Then we draw the fat white cross (figure 1d) and the fat red cross (figure 1e). Those are just simple centered rects.
noStroke();

// Fat White Cross
fill(whiteColor);
rect(0,height/2-fatWhiteCrossWidth/2, width, fatWhiteCrossWidth);
rect(width/2-fatWhiteCrossWidth/2,0, fatWhiteCrossWidth, height);

// Fat Red Cross
fill(redColor);
rect(0,height/2-fatRedCrossWidth/2, width, fatRedCrossWidth);
rect(width/2-fatRedCrossWidth/2,0, fatRedCrossWidth, height);
I should also mention that the colors I chose also come from the Wikipedia article:
color blueColor = color(0,36,125);
color whiteColor = color(255,255,255);
color redColor = color(207,20,43);
Like some other Wikipedia flag specifications the article offers Pantone colors, RGB equivalents, and “Web Safe” colors. Even though you may be programming for the web, never use the websafe colors. Websafe colors are from a palette of 256 colors that was developed for 8-bit displays back in the 1990s. There are few enough of these computers left that you can safely ignore them.
Prev: Italy
Your drawings are good but maybe you should do a simple step by step and make it more easy. I’ve found it quite tricky by following the a to e but next time you should make it easier in case younger teens or children go on it and mess up there homework or project.
Hiya again, sorry I was meant to say,your drawing and steps are great for people who are good at art and drawing, but some people might find this tricky and hard as im not good at drawing and found this website the best one but with hard steps. If you could possibly make this easier then that would be a huge differance and alot of help. Thanks again.
Sincerely Emma